


Medicine Operative Quick PVP Guide (SWTOR Patch 7.5.1)
A PVP Guide to the Medicine Operative Combat Style for Star Wars: The Old Republic. Including the best gear and stats, builds for 8v8 Warzones & Arenas, as well as gameplay tips and tricks.

This is up-to-date for Patch 7.5.1.
The video version of this guide is available on my YouTube channel here:
About the class
Medicine is the healing discipline of the operative class. Its playstyle revolves around healing over time and it’s the only healer, which has access to stealth. Long-time players will remember the days when Operative heals were the king of warzones and arenas, with powerful healing output and abilities such as infiltrate, flashbang, and a low cooldown hard stun, which allowed for offensive playmaking.
Unfortunately, those days are long gone and Medicine has suffered in Legacy of the Sith, losing more of its power in 7.0 compared to Sorcerer or Mercenary healers.
Nevertheless, if played right, the class is still capable of providing great group heals.
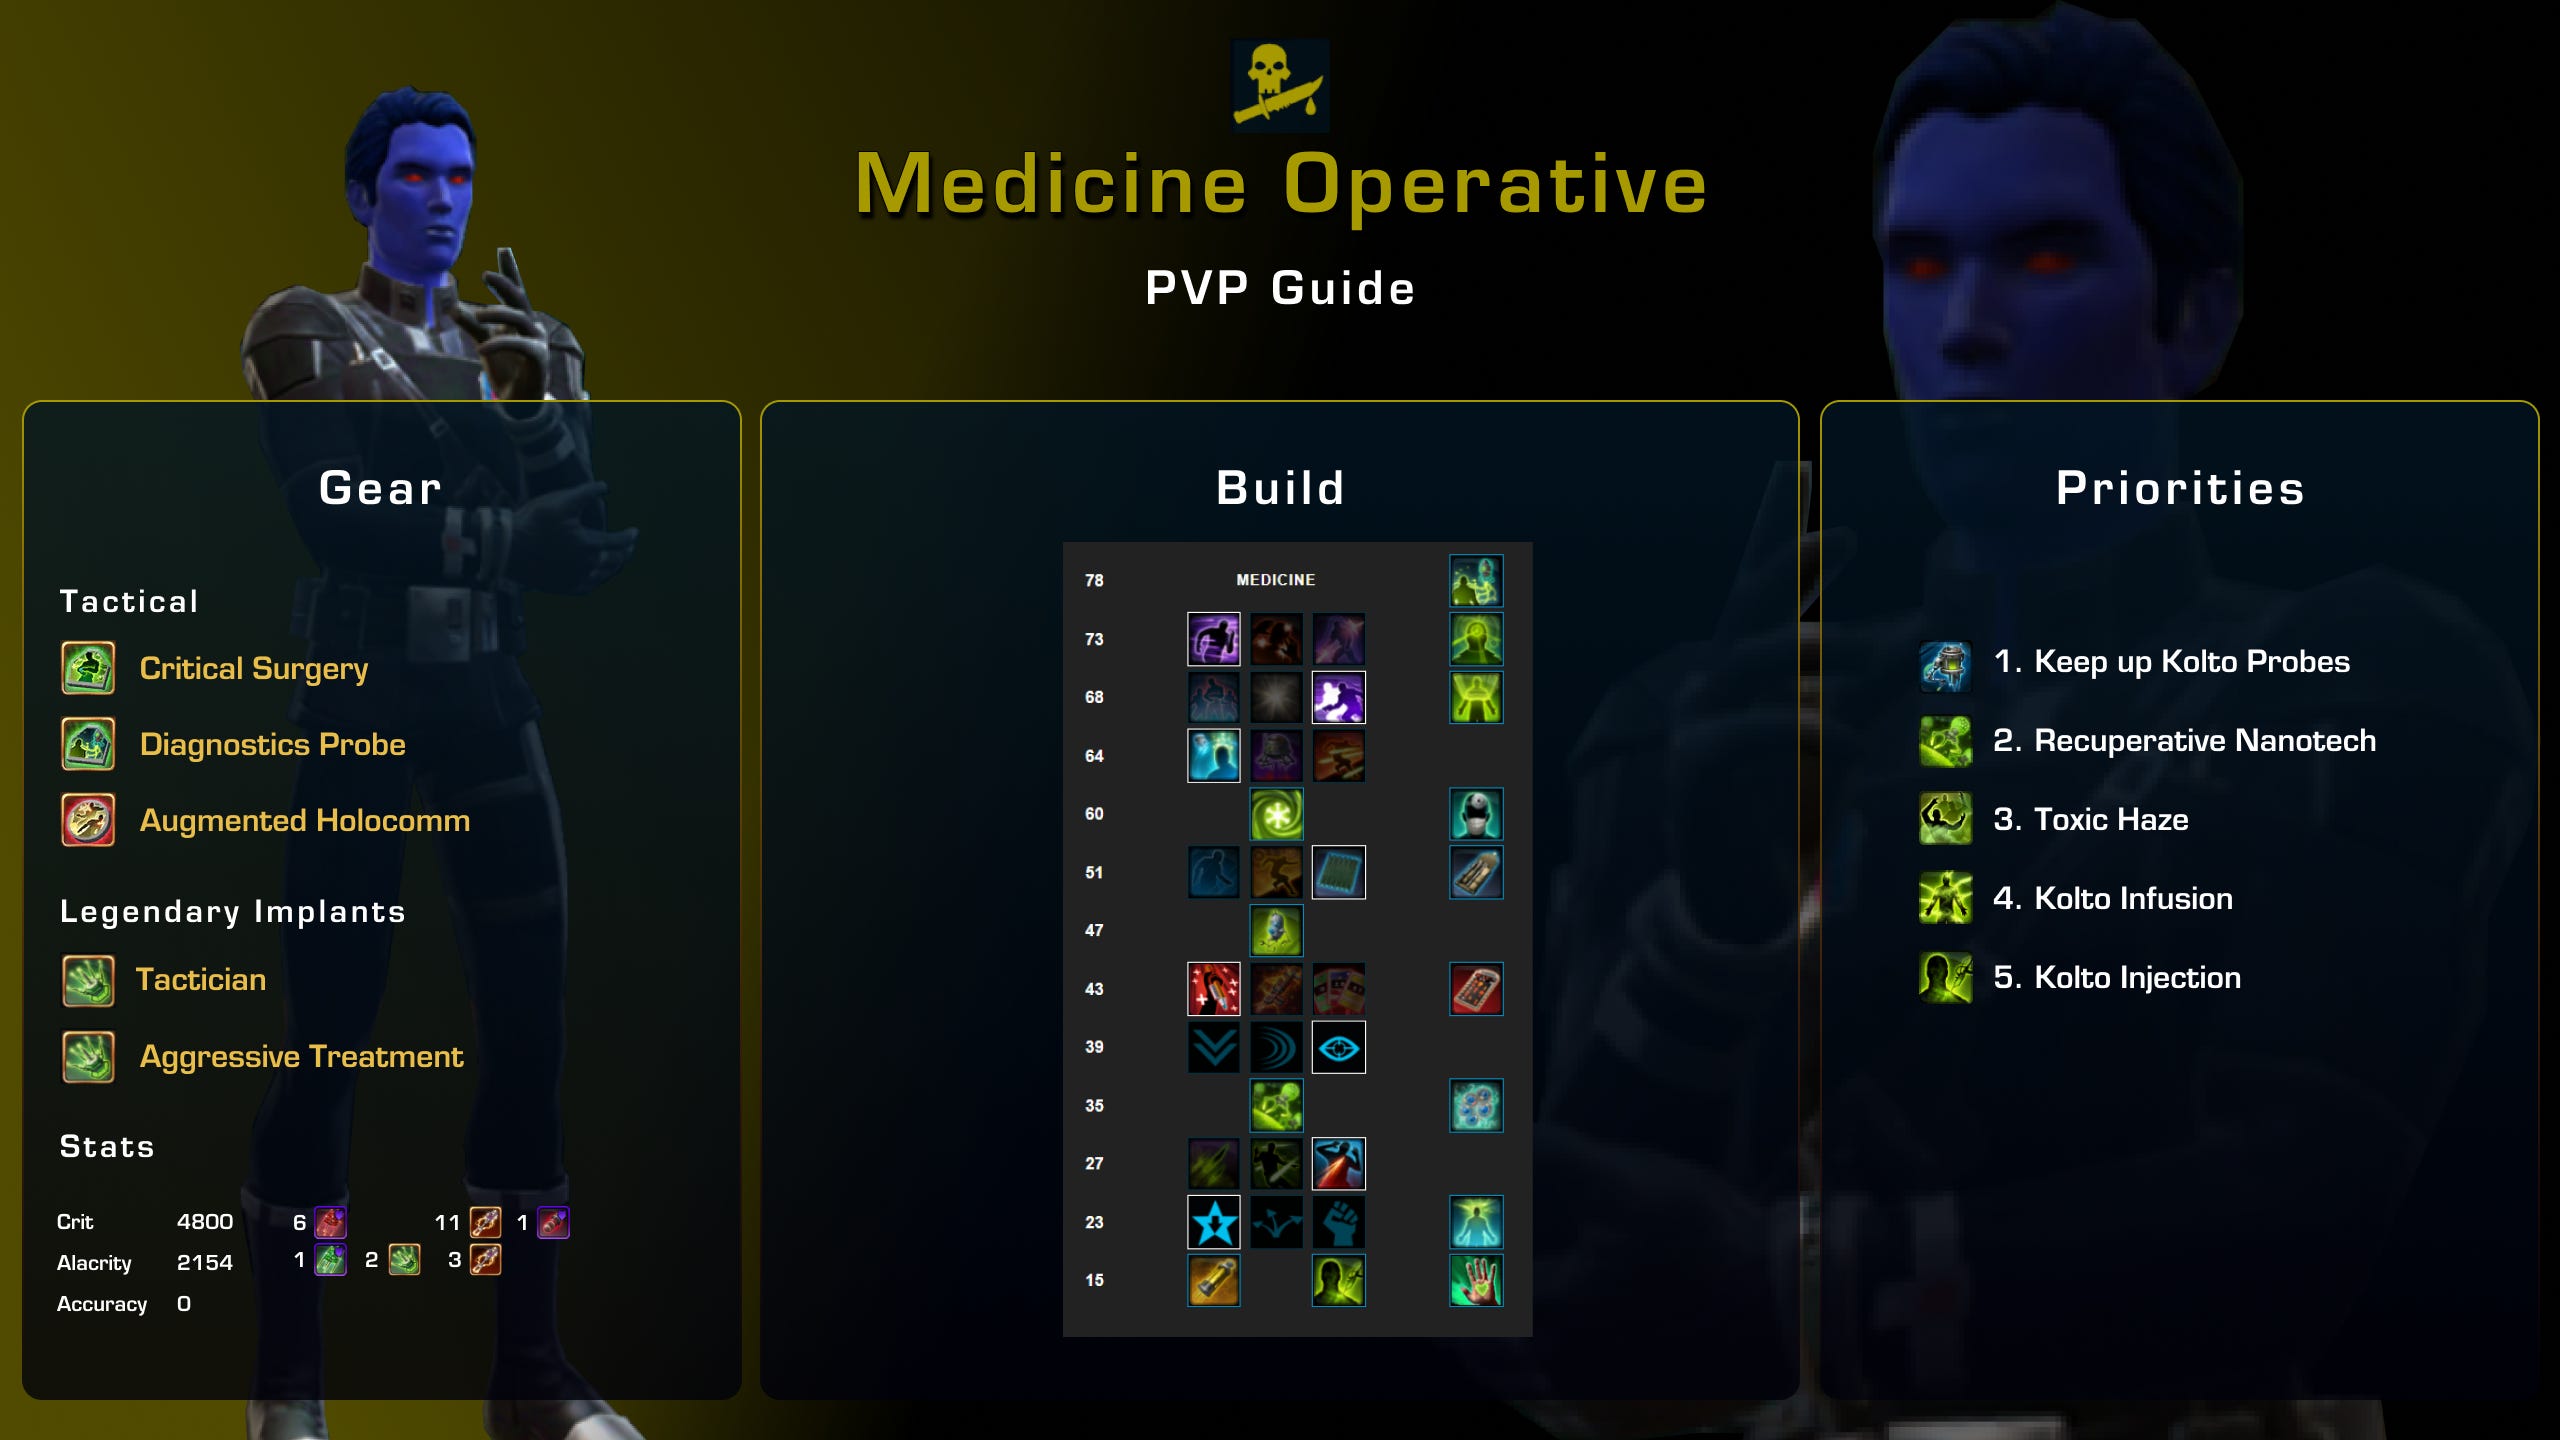
Tactical
You have three options for your tactical.
Critical Surgery makes your Surgical Probe always crit if used on a target below 50% hp. This is nice since you will be using Surgical Probe frequently to refresh your Kolto Probes. But since Surgical Probe doesn’t heal very much anyway outside of the autocrit you get every 18 seconds after using Kolto Infusion, the additional value you get from this tactical is rather small.

Diagnostics Probe is another option. It makes Surgical Probe reduce the activation time of your Kolto Injection, which is your big heal. This is nice for PVP since you can often be rudely interrupted when trying to cast it in order to save your teammates or yourself from being bursted. And that’s why I personally prefer running Diagnostics Probe over Critical Surgery.

Augmented Holocomm gives you a second use of Holotraverse, which is a movement ability that breaks roots and gives you movement speed. Also, it can be used on teammates, so this second charge can sometimes mean the difference between getting one-shot and barely escaping. So even though Augmented Holocomm does not directly buff your heals, if you’re dead, you’re not healing anyone either. So this one might be your best choice, especially if you’re playing without a tank.

Legendary Implants
The first legendary implant for this build is Tactician, which grants you 10% critical hit chance if you have a Tactical Advantage. As a healer, you can have three stacks of Tactical Advantage, so you should be able to almost always keep this buff up. Needless to say, this is a great buff to your heals, so you always want to run this one.

For your second legendary, I recommend running Aggressive Treatment, which turns your Toxic Haze into your second-best AoE heal. More healing is always good, and as Medicine, the range of your Toxic Haze will be increased to 30m, so you can use it from a safe distance.

Gear & Stats
Critical: 4800
Alacrity: 2150
Accuracy: 0
For your stats, you want to get your alacrity rating to around 2150. This will lower your global cooldown to 1,4 seconds and make your healing over time effects tick faster. For this, you need one alacrity enhancement, your two legendary implants, and three superior (golden) alacrity augments.
Once you have that, you want to get your critical rating to around 4800. To reach that, you need 6 critical enhancements, the earpiece, and 11 superior critical augments.
Since heals can’t miss, you don’t need any accuracy for PVP.
Build
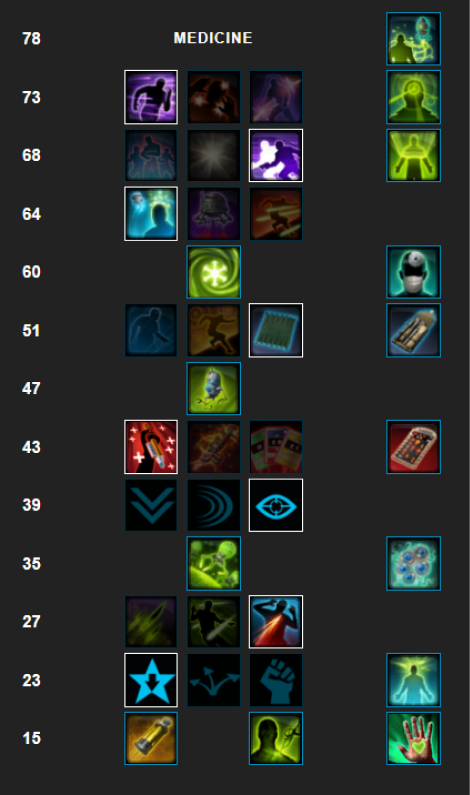
Level 23: Kolto Burst used to be the go-to choice before it got nerfed. I was never a big fan of the playstyle of standing in the middle of 8 people and spamming Kolto Injection on yourself. While this is still the best option for AoE, I prefer running Kolto Stim instead for a bit better single-target healing.
Level 27: Clever Countermeasures is not bad since 6 seconds of Evasion is almost as good as what Lethality has. But I prefer Debilitate because not only can the 4-second hard stun save your ass versus annoying melee dps, but it can also be used offensively to help your team secure kills.
Level 39: Critical Nanotech is a big boost to your best AoE heal and the other two options don’t really come close.
Level 43: For maximum hps, you want Tactical Effectiveness. But since Medicine struggles with Burst healing, I prefer Stim Burst for a nice 15 seconds of 15% extra healing. Tactical Overdrive gives you a reset on a couple of abilities and a nice buff to Mastery. If it would reset the cooldown of Holotraverse, maybe I would take it, but in its current form, it’s not going to save your ass and the cooldown of 3 minutes is just too long.
Level 51: Advanced Cloaking can be an option, but I prefer to stay in the fight as long as I can, and the 5% damage reduction from Chem-resistant Inlays helps with that.
Level 64: Med Shield makes your Shield Probe heal for about 40-50k when it breaks, which is some nice free hps. Evasive screen can be better in some situations, where you need to cloak out and don’t have Evasion to purge dots.
Level 68: Holotraverse is just too good to pass up. While Flashbang is another strong option vs melee, especially because it now comes with the Flash powder 20% accuracy debuff, being able to escape a sticky situation with Holotraverse beats in most games.
Level 73: And finally, we pick up Evasive Imperative because other than Cloaking Screen, Evasion is your only real defensive cooldown, so having it available more often is good.
How to Heal
Before the Match
Operative healing starts about 30 seconds before the warzone gates open. That’s because you need to apply two stacks of Kolto Probes to everyone before the fighting starts. Yes, your teammates will run out of range, probes will fall off, but the first fight is often the most important one, so you need to give your team the best chances right out of the gate.
Alternatively, you can just probe yourself and use your stealth to get to a safe position before the first engagement.
Priority System

Once you are in the fight you need to focus on keeping your probes up. Kolto Probes’ healing over time is powerful, but if you are just starting to apply Kolto Probes as you see your teammate’s health dropping in the ops frame, it might already be too late. As Medicine, you need to be more proactive compared to Sorc or Merc heal, which is why unless you are about to die, your highest priority should always be to maintain two stacks of Kolto Probes on everyone in range.
Once you get them to two stacks, you can refresh the effect by casting Kolto Infusion, Surgical Probe, or of course another Kolto Probe. Surgical Probe costs the least energy, so that’s preferable. But it consumes a stack of tactical advantage, so make sure you don’t drop to zero stacks, which is an hps loss because of Tactician’s Package.
Recuperative Nanotech is AoE heal over time, that can heal for more than 100k per activation. Those are crazy numbers, so whenever it’s off cooldown, press that button. Sometimes you need to decide between letting probes drop off or delaying Nanotech. In most cases, I still would prefer to keep up the probes first, but if you can hit Nanotech into 4 low hp teammates, it can take priority.
Toxic Haze is my third priority. If you place it well and your team can avoid the urge to immediately leave its area of effect, Haze’ hps is higher than Kolto Waves. Additionally, since it’s mostly used on Lethality, enemy players might not realize that you are in fact a healer, whereas the giant green circle of Kolto Waves is a great way to draw a bunch of aggro.
Kolto Infusion is not bad and can be your fourth priority, to be used mostly for triage healing a teammate taking burst damage. It consumes a Tactical Advantage, so make sure you don’t drop to zero.
Finally, Kolto Injection will yield your biggest crits, but the long cast time and high energy cost time make it only worth using with stacks of Diagnostics Probe or if whoever you’re healing is about to run out of hp before your Kolto Probes can do their job.
Gameplay Tips
If there are only two things you take away from this guide, those should be: stay safe and keep up Kolto Probes.
Remember, you are not a Mercenary, who can face-tank 6 dps players for a minute. Neither are you a Sorcerer who has Phasewalk and Bubble. Once your cc breaker and vanish are gone, you are about as survivable as a fish on land. So unless you have guard, find your safe space next to a pillar and if anyone hits you, kick them in the nuts with Debilitate and roll around the corner to break line of sight.
Keep up your Kolto Probes, even if it means letting a teammate die. Obviously, you’d prefer not to let your teammates die. But the reality is you cannot save them all. Especially since dps players tend to chase enemy ranged behind pillars or simply jump out of 30m range every opportunity they get. Remember:
“Who is more foolish? The fool or the fool who follows him?”
Obi Wan Kenobi - Operative Main
The worst thing you can do is to follow those foolish dps players, thereby putting yourself into a bad position, which will get your cced and bursted, meaning you need to stealth out, your probes drop, which means now your whole team is low and the teammate you tried to save probably died anyway.
Instead, stick to the plan, focus on your own survival first, and keep up those Kolto Probes.
Finally, if plan A fails and you find yourself needing to cast Kolto Infusion or Injection. Using both charges of your roll will give your interrupt immunity for 4 seconds, which can be enough to get some clutch casts off.
That’s all for this guide. Have a question? Let me know in the comments below!