
Deception Assassin PVE + PVP Guide For Beginners (SWTOR Patch 7.7)
Hi guys, Ivano here with a beginner's guide to the Deception Assassin class for Star Wars The Old Republic Patch 7.7. It covers both PvP and PvE, including gear, stats, and rotations.

This is up-to-date for Patch 7.7
The video version of this guide is available on my YouTube channel here:
Quick Summary

About the class
Deception Assassin is a direct damage stealth dps class, that’s especially strong in solo play and Arena PVP. It’s easy to learn and fun to play, with its playstyle revolving around ambushing unsuspecting enemies from stealth with huge burst damage.
Gear
First, let's talk about gear. For PvP, get a set of Thyrsian 336 gear from the PvP vendor. For PvE, aim for modded gear with item rating 340 or go directly for Rakata gear, which is the best at item rating 344. You can find more detailed gearing tips in my dedicated gearing guide here.
For relics in PvE, use Rakata Relics of Serendipitous Assault and Focused Retribution (Mastery and Power proc). For PVP, the equivalent Thyrsian Relics will give you the same stats in a Warzone.
For Legendary Implants in PvE, I recommend Dynamic Force and Force Training. Really nice implants that passively buff your damage, but you don’t need to think about them or manage any procs like with some other classes. In PvP, you can replace Dynamic Force with Shadowcraft for a crazy 6-second burst window after you open from stealth. (Shadowcraft does not work on Operation bosses!)
For Tactical items, The Awakened Flame is generally the best for PVE dps, while Two Cloaks is generally the best choice for Arena PVP or defending objectives.
Stats
Now let's look at stats. For PvE, 110% accuracy is a must-have. To reach it, you will need at least 2700 accuracy rating. Then focus on alacrity (between 2100 and 2200), and put the rest into crit.
For PvP, you only want around 5% accuracy, so simply exchange two gear pieces with crit for accuracy and you’re good to go. This means you should end up with ~1100 accuracy rating, 2100-2200 alacrity, 4800 crit.
All these can vary slightly depending on your gear level, augments, and companion bonuses. So don’t worry if your crit is a little low, just make sure you hit 2700 accuracy for PVE and at least 2100 alacrity.
Build
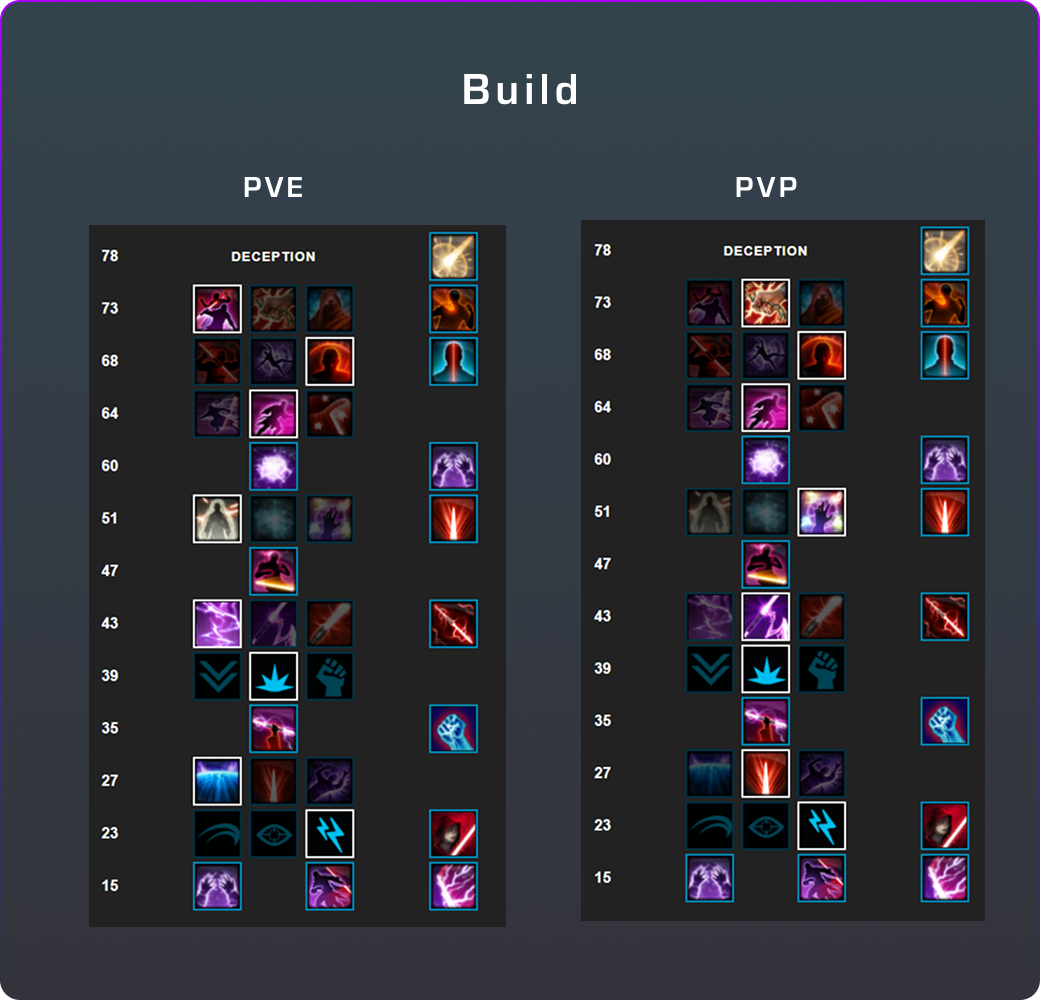
For PVE, you want Lightning Engine at level 43 to not run out of Force in longer fights. For PVP, choose Lightning Critical to maximize your burst.
At level 51, the 60% AOE damage reduction is really powerful in PVE, but in PVP, the cc immuntiy on Deflection is much better.
On level 73, Reaper’s Rush is great for questing and solo’ing heroics, while Avoidance or Shroud of Madness are superior options in PVP, depending on the situation.
How To Do Damage
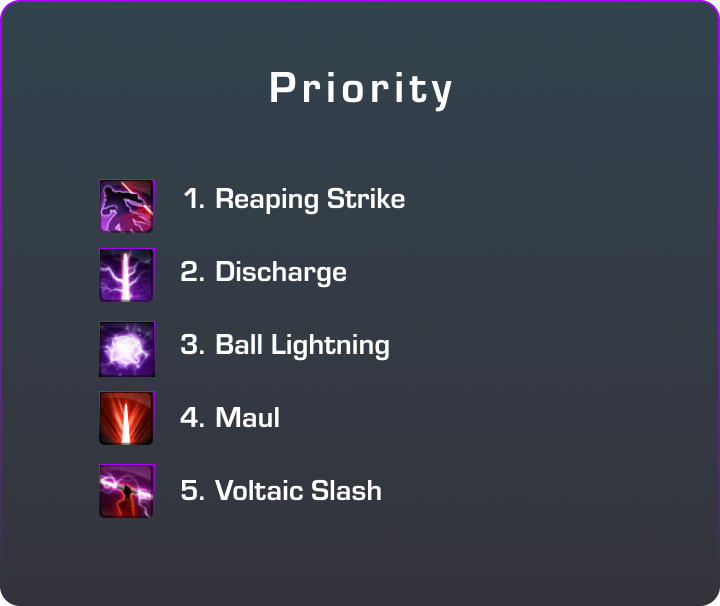
Deception does not have a real rotation, but uses a priority system, which sounds complicated, but it’s actually very easy once you learn these 5 abilities.
In a nutshell:
Use Reaping Strike whenever it’s available
Use Discharge whenever it glows
Use Ball Lightning when it’s glows
Use Maul when it glows
Else: use Voltaic Slash
Whenever you use an ability, you have a chance to build a Static Charge. Once you get three Static Charges, your Discharge will start to glow, and that’s when you should use it for maximum damage.
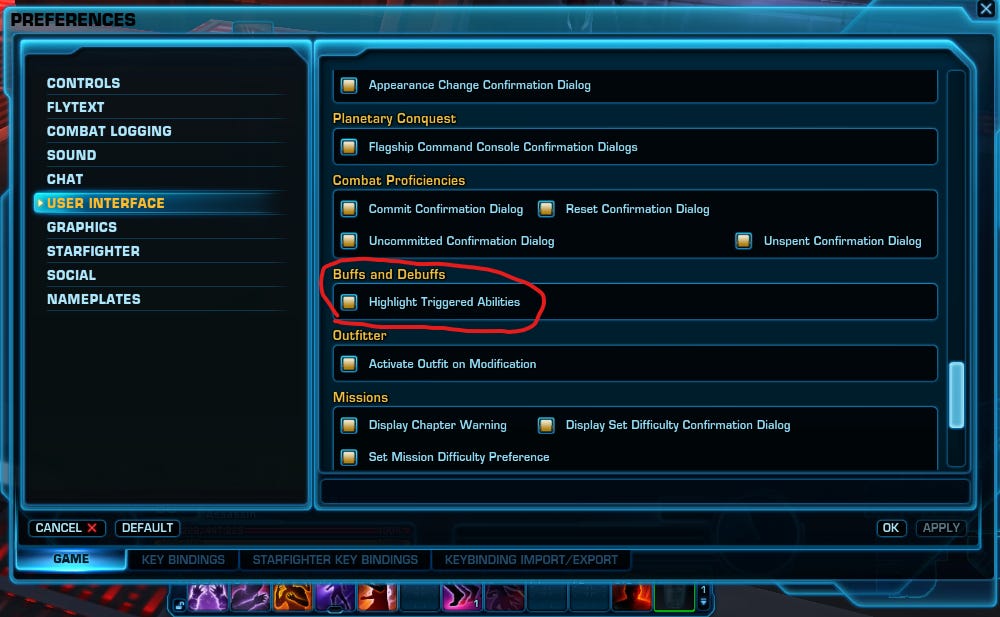
Note: If your abilities are not glowing, go to Preferences → User Interface → Scroll Down to Buffs and Debuffs → Activate Highlight Triggered Abilities
Your Ball Lightning will generate an extra Static Charge if you use it after using Voltaic Slash or Lacerate. So that’s why, before the fight, we want to use Lacerate twice and keep using Ball Lightning as often as possible.
Your offensive cooldown is Recklessness, which instantly gives you three Static Charges and boosts the critical chance of your next three force abilities. Combine these with your opener for maximum burst. You want to use this after you have just used Discharge for a double discharge combo.
Next, Reaping Strike hits very hard, but has a rather long cooldown. However, the good news is that because of our level 23 talent Energized Blade, its cooldown gets reduced by 6 seconds whenever we crit with a force attack. And our force attacks are of course Discharge and Ball Lightning. So you want to use Reaping Strike first whenever it’s available so that you put it on cooldown and have a chance to reduce that cooldown with Ball Lightning and Discharge.
Ability number four is Maul, which is interesting because it does more damage when used from behind the target. Once every 8 seconds, it will start to glow, which means it will do 25% more damage and cost less force. But because that can only happen every 8 seconds, you are not losing any damage if you don’t use it immediately. So this is why Maul is only our fourth priority.
If none of these four abilities are available or glowing, we use Voltaic Slash as a filler and to keep up our Voltage Stacks.
The way you want to start a fight is by using Lacerate twice to build your Voltage stacks, then use stealth and Phantom Stride to get in range, followed by Reaping Strike, Discharge, Ball Lightning, and then just follow the priorities above.
Here is a demonstration of how that looks in practice:
How to play in PVP
PVP is a lot more dynamic than PVE, because your opponents will use defensive cooldowns or crowd control to make your life hard, but the way you do damage still follows the same priorities as above.
One thing that will be different is your opener. For PVP, we are using the Shadowcraft legendary implant, which gives us 6 seconds of 100% critical hit chance after using Phantom Stride from stealth. Also, we will be running Lightning critical, which means that after using recklessness, our next three abilities will crit, and that includes melee abilities too!
Also, in PVP it’s most important to keep your enemy cc locked, so that they are unable to use defensive cooldowns that might ruin your burst. To do that, we are running Maul Spike at level 27, which turns your maul into a 2-second stun when used from stealth. Afterward, we use Low Slash from more than 4m away for another stun, followed by Discharge and then Electrocute for a third stun before unleashing our Recklessness, Reaping Strike, Maul and another Discharge all of which will be critical hits.
Here is how that looks:
After that, your target either has to use a defensive cooldown or hit the respawn button. In the former case, you need to decide whether you can finish them off through the defensive or whether it’s best to swap targets.
As a general note, Deception does best in small-scale fights (e.g. 1v1, 2v2 Skirmishes) so, if possible, you want to avoid jumping into the middle of a big zerg and rather play like an Assassin and pick off isolated low-hp targets.
Keep in mind that Force Cloak can also be used offensively to proc another Shadowcraft as it resets the cooldown of your Phantom Stride, and with the Two Cloaks tactical, you can do this combo twice!
AOE
Deception needs to give up its tactical to do any meaningful aoe damage, and play May Cause Injury instead. But that nerfs your boss damage, so it’s not an option in PVE, and I don’t recommend it for beginners in PVP either.
Defensives
Mass Mind Control is overpowered in PVE, as most damage you will take as a dps will be aoes, and so can be reduced by 60%.
Force Shroud can be used to make you completely immune to most Force and Tech attacks, but keep in mind it only lasts a few seconds, so you need to time it right.
Deflection is the opposite of Force Shroud, as it protects you against Weapon attacks by increasing your defense chance and lasts quite a long time. With our PVP build, this also grants you 6 seconds of cc immunity, so use it when you expect to get stunned.
Force Cloak is your combat stealth and can be used as your Oh Shit button if your HP drops dangerously low. If you have any dots on you in PVP, make sure you are running Shroud of Madness before stealthing out, although Force Shroud before Cloak works as well.
That's all for today! Hope this guide was helpful. Let me know in the comments what you thought, and if you want more guides like this.