
Darkness Assassin Quick PVP Guide (SWTOR Patch 7.5.1)
A PVP Guide to the Darkness Assassin Combat Style for Star Wars: The Old Republic. Including the best gear and stats, builds for 8v8 Warzones & Arenas, as well as gameplay tips and tricks.

This is up-to-date for Patch 7.5.1.
Thanks to Beoknez and Døxic for helping with this guide!
The video version of this guide is available on my YouTube channel here:

About the class
Darkness and its republic mirror Kinetic Combat are the only tanking disciplines in the game that have access to stealth. This unique combination makes them one of the best classes in the game for defending objectives and winning Huttball. As a tank, Darkness excels at keeping teammates alive and annoying opponents with crowd control.
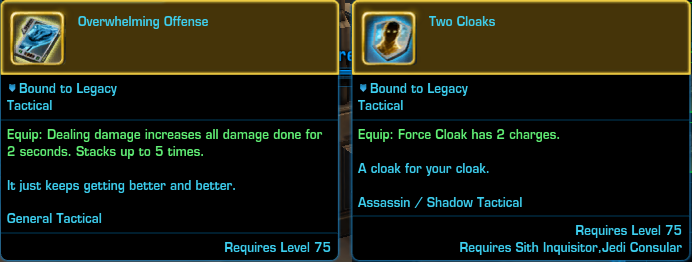
Tactical
You have two options for your tactical: Do you want to focus on survival and objectives? Go for Two Cloaks, which gives you a second use of your Force Cloak.
Do you want to stay in the fight and maximize your dps? Go for Overwhelming Offense, which gives you a stacking buff of up to 5% extra damage done as long as you keep hitting people.
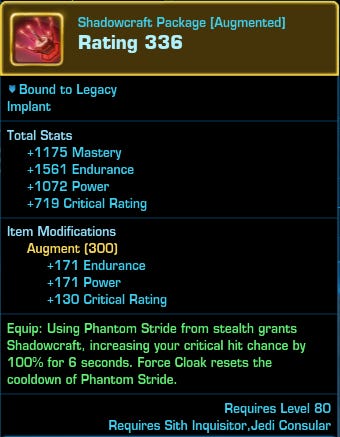
Legendary Implants
The first legendary implant for this build is Shadowcraft, which grants you 100% critical hit chance for 6 seconds after using Phantom Stride from stealth. Very powerful during your opener or after using Force Cloak offensively.
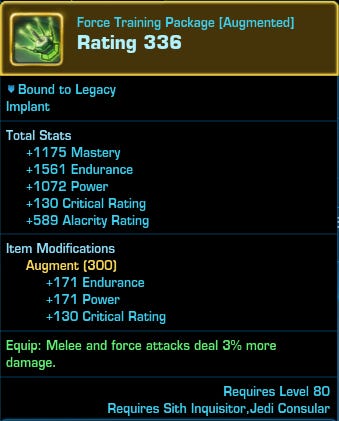
For your second legendary, I recommend running Force Training, which increases your Force and Melee damage by 3%. Nothing special, but more damage is always good.
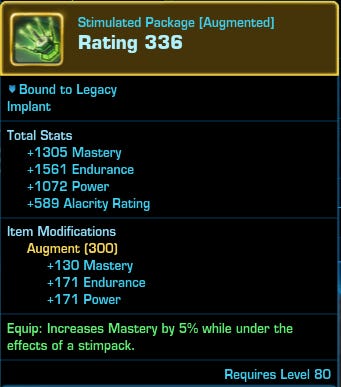
You can also run Stimulated instead of Force Training. Based on my testing, the difference in dps is not noticeable.
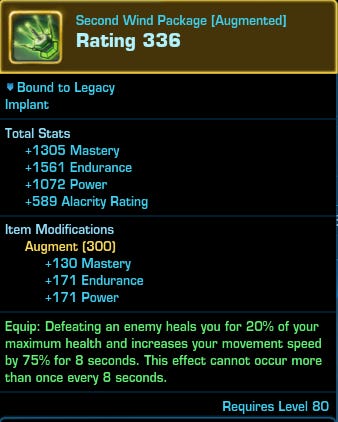
As with most classes, if you are running without a healer, you can substitute your second legendary for Second Wind.
Gear & Stats
Critical: 4800
Alacrity: 2150
Accuracy: 0
Defense: 0
Absorb: 0
Shield: 0
We are going to be running a “Skank” setup, meaning even though we are playing a tank, we will use dps gear and dps stats. This is not only because doing maximum damage is so important in the current expansion, but also because tank stats, such as Defense or Shield Rating don’t work against many of the meta classes such as PyroTech PowerTech and Madness Sorcerer. Those classes do mostly internal and elemental damage which cannot be defended or shielded in PVP.
This is why we will maximize our damage be running full dps gear. The only exception is our Offhand, where we will be equipping a Shield with dps mods. This makes us very tanky against anything that isn’t internal or elemental damage because just by having a Shield Offhand, we get 20% Shield Absorb, which synergizes well with our Dark Ward and level 15 passive, both of which give us Shield Chance for free.
For your stats, you want to get your alacrity rating to around 2150. This will lower your global cooldown to 1,4 seconds and lower your offensive cooldowns. For this, you need two alacrity enhancements, your legendary implant, and three superior (golden) alacrity augments.
Once you have that, you want to get your critical rating to around 4800. This will make your Shock hit pretty hard. To reach that, you need 5 critical enhancements, the earpiece, your Shadowcraft legendary, and 11 superior critical augments.
Since tanks get a passive 10% accuracy, you do not need any accuracy rating on your gear.
Build
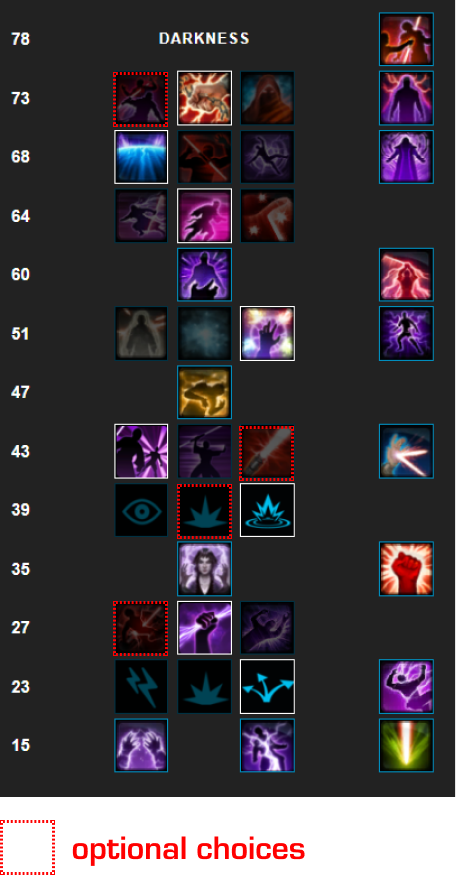
Level 23: Chained Volts give you extra cleave damage on your Depredating Volts. The radius for this is only 5 meters, but if your enemies stack it can add quite a bit of damage.
Level 27: You have two options. Spike if you want more cc to peel for your teammates or just to be a general nuisance or Energized Shock for 50% extra critical hit damage on Shock. Personally, I prefer to do maximum damage, but Spike can be a valid option as well.
Level 39: There are two choices here again. Twilight Ward for the reduced cooldown on Recklessness, meaning more damage, or Gloom Ward for reduced cooldown on your Mass Taunt. Personally, here I prefer the second option because it’s crazy how fast you can have your Mass Taunt back.
Level 43: Dark Forces synergizes very well with Gloom Ward. To maximize the heal you get from this use your Mass Mind Control together with Wither and Depredating Volts. Alternatively, you can run Overcharge Saber if you need the damage reduction because you are being targeted.
Level 51: I take Dark Stability because while you don’t get stunned all that often these days, there are situations such as walking over a trap in Huttball, where you simply must avoid getting stunned at all costs, and the 30% stun damage reduction is not going to save you. Fade is also an option, but in most games, I prefer Dark Stability.
Level 64: While stuns are not as common as they used to be before Legacy of the Sith, roots and slows are everywhere. That’s why taking Force Phase is a must for PVP.
Level 68: I take Overload which is great for peeling melees off your teammates. The knockback root can also be used to push opponents into the Huttball traps or off the bridge in Voidstar.
Level 73: Avoidance is the best choice overall because it gives you 3 separate effects: lower cooldown on your Force Speed, two seconds off your interrupt, and 30 seconds off your cc breaker. You mostly want this for the Force Speed cooldown, but the added bonuses are nice. Reaper’s Rush lets you use Assassinate during your opener, which is nice for burst. Shroud of Madness is useful for purging damage over time effects and making sure that you stealth out clean. But you can also do that with Force Shroud and in general I like staying in the fight as a tank and being mobile, so I run with Avoidance.
How to do Damage
Opener
This is how you want to start most fights.
Phantom Stride
Assassinate (if you picked Reaper’s Rush, otherwise use Trash)
Recklessness + Shock
Depredating Volts
Wither
This combo takes advantage of the 100% critical chance from your Shadowcraft Legendary Implant. It can hit for 250k damage in 6 seconds or around 43k dps, which is pretty crazy for a tank.
Priority System
PVP is dynamic, which means that people run away, use defensives, etc. So you will need to react to what they are doing and use your abilities accordingly. This is why we are using a priority system instead of a fixed rotation. This system is very simple to use once you memorize the order.
It works like this: If you can use ability #1, do it. If it is on cooldown or you cannot use it right now for a different reason, use ability #2. If you cannot use ability #2, use ability #3, and so on.
The priority is as follows:
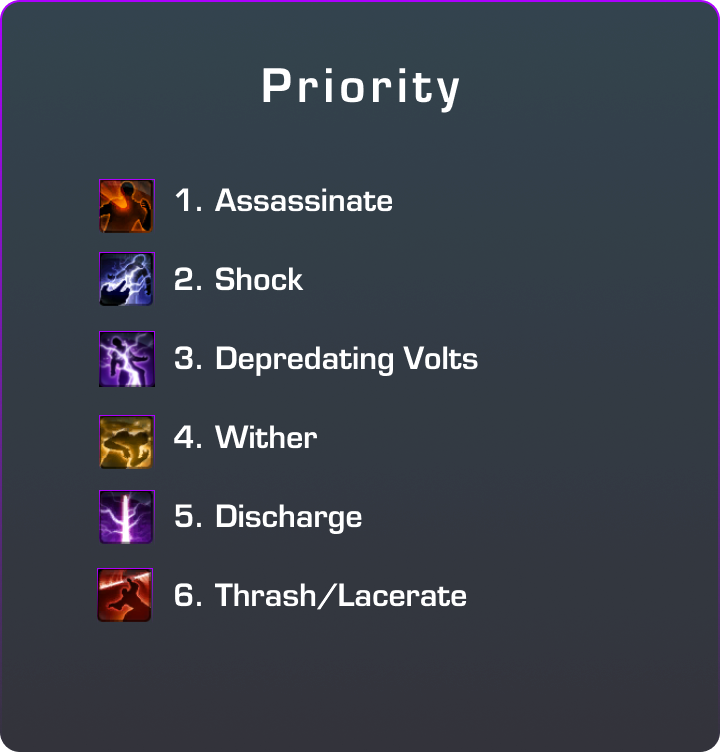
You can only use Assassinate when your target is below 30% HP or if you picked Reaper’s Rush at level 73. It does great damage, so if it is available, you should take the chance and use it.
Shock can hit for upward of 100k, if you picked Energized Shock at level 27. It also gives you a stack of Harnessed Darkness (Level 73 passive), which buffs the damage of your Depredating Volts. That’s why you want to prioritize Shock over anything that isn’t Assassinate.
Your third priority is Depredating Volts (DV). It hits for around 4x 20k damage and also slows its target by 50% for the duration of the channel. Note that it’s an overall dps gain to use it on cooldown and not wait until you have three stacks of Harnessed Darkness. Also, the damage reduction you get from that is so small that you don’t really need it.
Wither also provides a stack of Harnessed Darkness and slows enemies by 30%. Great if you can hit three or more targets.
Darkness Discharge is another area of effect ability, that reduces the target’s melee and ranged accuracy by 5%. Its damage is increased by 75% when you shield, parry, or deflect and attack because of the level 60 Lightning Reflexes passive. So if the ability glows and you can hit three or more targets, go for it.
If none of the higher-priority abilities are available, you want to use your fillers. Those are Thrash if you can only hit a single target, or Lacerate if you can hit multiple targets. Both have the chance to proc your level 51 Energize passive, which resets the cooldown of your shock and turns it into an autocrit. Energize is also the reason, you want to use Recklessness with Shock, since the passive also grants it an extra 50% critical damage. Finally, Assassinate will always trigger Energize, which is another reason why it’s priority #1.
Gameplay Tips
Guard is one of the most powerful abilities in the game and if you are not using it, you’re trolling. It redirects 50% of the damage your guarded target takes to you, which makes them very hard to kill. So drop it on your healer before the start of the match and swap it if one of your teammates drops low. Remember that you can apply Guard from 30 meters away, but the damage redirection effect only works if you are within 15 meters of your target.
Dark Ward should be used in stealth before a fight. It lasts 20 seconds or until all the stacks are used up, so remember to refresh it frequently.
With Shadowcraft, Force Cloak resets the cooldown of your Phantom Stride, which means you can use Cloak offensively to get another 6 seconds of 100% crit chance by using Force Cloak → Phantom Stride and then going into the Opener combo described earlier.
Staying in stealth just before pulling a ball carrier into the Huttball traps is great fun.
That’s all for this guide. Have a question? Let me know in the comments below!